See You at the Long Beach Scuba Show!
Fantasea Line and I are sharing a booth together at this weekend's Long Beach Scuba Show. We're in booth #737 and will have lots of great photo toys like the new FD80 and FD40x housings, the new CoolPix L10 and L11 as well as the prototype of the new FP5000 housing for the very cool new Nikon CoolPix 10MB P5000 digicam.
Lots of accessories, arms, filters and much more.
All at special show pricing with free shipping this weekend only!
Stop on by and say hi!

Lots of accessories, arms, filters and much more.
All at special show pricing with free shipping this weekend only!
Stop on by and say hi!
Look Honey! It's Diver Jack!
 My aquarium dive buddy Tim and I were walking back to our cars after "performing" our feeding show at the Seattle Aquarium today. I worked comms and topside support as I had wanged my eye with a strobe cord yesterday (don't ask), nothing serious, but no diving for a couple of days.
Tired and laden with wet gear I suddenly heard a woman in very excited tones say, "Oh look, it's Diver Jack! Honey, it's Diver Jack. May we take your picture?" Huh? Me??? What'd I do??
Diver Jack is my stage name. We now do feeding shows, talking to the audience, taking questions and showing off the wolf eels and animals when we feed them. The wolfies are my pets and will sit on my head to eat squid. We use full-face Aga masks and comms with surface-supplied air. As part of that, we wave to the crowd, talk to kids, and get people involved, so that we can impart a conservation message.
But I never thought I'd have groupies!
My groupie was cute as a bug, pretty in pink, and about 3 years old. Very excited, Mom asked to take my picture with her daughter Gretchen. I taught Gretchen how to make an "ok" sign. She was so excited she could hardly talk. So was I.
They promised to come to other shows, and it seemed we had both made our afternoons.
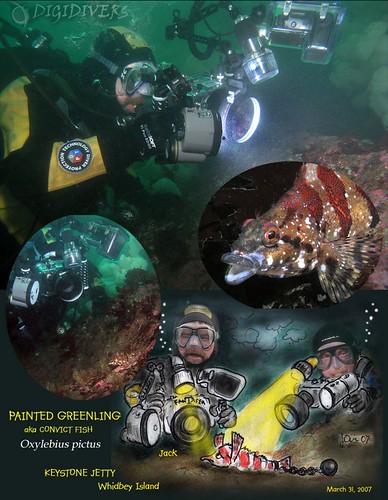
The DigiDivers Do Keystone!
 I had the great pleasure of finally meeting and diving with Jan Kocian, aka "Honza" at his favorite local spot, Keystone Jetty, where one of the ferries comes in on Whidbey island, here in Puget Sound.
Our club dives there on and off as conditions can be tricky, it is very open to the wind and currents can be strong and un-predictable, even at slack. Even so, it is a very popular state park with great facilities, hot showers even. So I was very surprised when we pulled into the parking lot at 10am and found it completely empty on a Saturday morning. Usually it is jammed up with student divers.
Winds were light and off-shore. Overcast, but no rain. The currents were settling down and as we started to get ready, Jan pulled in and we greeted each other, having had long mutual admiration for each other's work on the various boards including DigiDiver.net. We've traded emails on and off, but never quite connected for a dive.
 We looked each other's rigs over and got in the water. Of course the first thing that DigiDivers do is to take pictures. Not of marine-life, but of each other!
Swimming out along the jetty, there was a very slight current pushing us out and then once we kicked through it's back-eddy we were completely out of the current at the end of the jetty. It is usually very strong and can even be somewhat dangerous, as it can sweep un-wary divers around to the other side underneath where the ferry comes in. Not fun, and a long walk back.
I've never seen the conditions so nice and Jan said it had been that way all week. The critters weren't too cooperative, but we shot a few fish and nudis.
All-in-all, a great dive and I enjoyed meeting Jan. I've invited he and his family down for a tour at the Seattle Aquarium and i hope to dive with him again soon!
Here's his commemoration of the event:
Here's a link to some of Jan's other work and a bit more about him: REEF - Jan's Creations
Willy Volk Surfaces
 My good friend Willy Volk late of Divester fame has surfaced again in a new diving blog that everyone should bookmark a feed from.
The new X-Ray Magazine blog is tied to the equally excellent e-magazine to which I was a contributor of a section on PNW diving (they don't seem to publish me anymore, sniff).
X-Ray Magazine, "is an awesome magazine about scuba diving with a truly international focus. This blog is designed to complement the magazine. Check in often for interesting scuba news from around the world. If you've got a news tip, we'd love to get it. Send tips to: willy@xray-magDOTcom." according to the blog.
Divester was killed by AOL, but Willy remains on staff now writing for the travel blog Gadling, which is also worth bookmarking.
Five Tips for Better Underwater Photography
This is the second monthly column written for NW Dive News Previous column: Getting Started in UW Photography
Got a new underwater camera? Photos not quite up to snuff? Here are 5 quick tips to help you out.
Tip #1. Get close, have a conversation. If you think you are close, get closer. Two to four feet away is where most digicams shine. Many have a macro setting that can focus the lens from 1" to 4'. That’s the setting to use most of the time, as it is the perfect range for your strobe and for best sharpness. Remember that the more water you have between the camera and the subject, the less sharp and vivid your shots. But be careful in getting too close, there is a point where cameras cannot focus, check your manual.
Try to capture the head and eyes of your critters. Have a conversation with them, just like when you meet someone and shake hands.
Tip #2. Shoot up. Use the available light to help light your backgrounds for "reefscapes".

Tip #3. You can't light everything. In combination with Rule #1 & 2, try a type of shot called a close-focus, wide-angle.
Get close to say one fish, a nice outcropping of coral, or an anemone. Light that with your strobe. Point at an upwards angle, setting your camera on auto, or meter the water column and select a slower shutter speed (not any lower than 1/60th) to let the available light open up the background. Center the subject and take a half squeeze on the trigger to focus. With your finger still holding the half-press, re-compose with the subject close and to the side, maybe lower in the frame. Hold your camera steady and squeeze the trigger the rest of the way. Now you have a nice shot of a subject and it's environment giving greater depth and drama.
Tip #4. Macro. To get a nice black background, use your strobe in TTL, or auto, and increase your shutter speed. Set it as fast as possible, with a low ISO for sharpness and the strobe as close as possible to the subject for the best color saturation. You may have to turn the power down and use a diffuser to soften the light.
The background is always controlled with shutter speed. Want to open it up? Shoot slower. Want it blacker? Shoot faster. Can't get what you want? Adjust strobe power or position so you can work with it. Close in is where TTL usually shines. If you’re shooting in mid-water, you'll do better with manual strobe settings.
 Tip #5. In-between. What about fish portraits and buddy shots? Set your camera to manual, or on program mode. Set an aperture somewhere in the middle (maybe f4) and shutter speed to as slow as you can hold, usually about 1/60th. Increase the strobe power or use TTL/auto.
Set the ISO as slow as possible. Remember, higher ISO means more noise, seen as fuzziness. Set it at ISO 100, or lower, for macro. For other shots, try to not go above 200 to 400.
On digicams where you don't need the depth of field, the middle aperture setting (f4) gives the best sharpness. This is due to the very small actual apertures on these lenses and the way light waves pass through them.
Tip #6. Break the rules! Hey, you said 5 tips. Well, the sixth is simply to break the rules. Try things out. Experiment. Many times the best shots come from bending, breaking, and creating your own rules. Look at your mistakes carefully, learn from them and try another variation.
Have fun with underwater photography, the more you shoot, the better your shots will get!
--------------
Jack Connick is a Seattle diver and graphic designer who always wanted to be a photographer. He writes a blog, Optical Ocean on diving, sailing and underwater photography, and has traveled extensively around the world, logging around 700 dives in ten countries.
His company Optical Ocean Sales.com, is an authorized dealer for Fantasea Line underwater photography products.
Visit and join his free Cold Water Diving Flickr photo group.
Junkyard Dogs
Randy, Jim and I dove the wickedly tricky Alki Junkyard on a photo op yesterday around 4pm. The rain had let up and conditions were quite easy. Parking even became available as we pulled up.
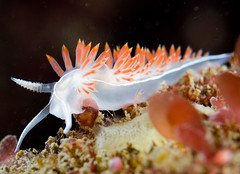
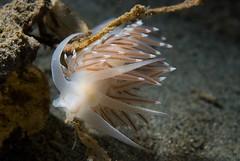
An easy swim out to the white buoy with a blue stripe landed us in junkyard central. I have to say this is one of the best macro sites I've seen around here. It was loaded with small fish, anenomes and most of all - nudibranchs!
I quickly spotted Janolus fuscus, Flabellina trophina, and found a very cool Armina californica out on the sand. Or; a clear one with yellow dots, red with white dots and a striped nudibranch. The later is one I'd never seen before, mostly because it is a burrowing nudibranch that feeds on sea pens. Even stranger is that it has no external gills on its behind like most do.
Everything was pretty small though; many the size of a quarter or half dollar. I could of used a 100mm macro lens as opposed to my new 60mm I was trying out on the new D80/Fantasea rig.
The current picked up while we were out and shooting out on the flat became hard. Everything wanted to go into the current and I couldn't get ahead of it to get "face" shots. But there were a few piles of junk that you could hide behind, and I found some scaly-headed sculphins there, always a crowd pleaser with their green eyes.
We spotted lots of crabs and shell middens, but no octos, but they sure looked like they'd been around recently. Also spotted "dinner" several large male dungeness crabs up in the shallows.
We didn't go far up into the current, staying at 50' or so the entire dive as a result we had a long hour dive, Randy did 70 mins.
This is a great photo friendly site with easy access, no rocks to trip over and a wall to set your rig on after the dive.
Photos are here.
iNova DSLR E-Books
 I recently bought the iNova E-Book for the Nikon D-80. Even though I thought I knew a fair amount about color and digital technology, the book gave me a much better, up-to-date understanding. It then went over the camera, how to use it, tips and techniques and lens and strobes - in much greater detail and clarity than the user guide.
I think these are some of the best manuals/instruction books available for any photographer, advanced or beginner. The content is stunning, easy to use, and uses Acrobat technology to show you in much greater detail and interactivity how to utilize your camera. They are available for the Nikon D70, D80, D200 (soon D40) and the Canon 350 and 20. Get up to speed much faster without dealing with a OEM manual written in 4 languages, none of which you speak!
They include both high and low rez files, a printed instruction book, plus 624 iNovaFX Actions, that are in themselves enough to pay for the cd.
The DSLR series of eBooks was born of a necessity. The majority of photography books are basics, expansions on manuals, dry, procedural, technical and generalized. As a group, they don't give you the understanding and immediate tools to better your images with your particular camera and lens, highlighting the unique opportunities, qualities, controls, menu items and synergistic combinations that were there for you, if only you had known.
What we really need is a knowledgeable friend looking over our shoulders as we shoot, advising, chiding, challenging and bantering in creative ways, but after some research, we found that providing this as a service would be cost-prohibitive. So we made digital photography's first eBooks.
Photography can be technical. Pixels and photons, hyperfocal distance and guide numbers. It's enough to make you scream. But all that stuff is worth knowing about -- or skimming through -- so we make sure it's in there in a form that is easy to digest, or dig into if you feel like a meal. Animated examples, interactive illustrations and embedded movies bring the most opaque subjects into clarity. We feel it's our job to lift your eyebrows with interesting things on every page.
Click for more info. Get free shipping when you order!
Getting Started in Underwater Photography
I’ll be writing a monthly column for Northwest Dive News on underwater photography, one of the most popular activities in diving today . I’ll be concentrating on cold-water dive photography which has it's own set of skills and equipment. Tips, tricks, gear and local dive sites, I’ll try to touch on them all and more.
I’ll re-print them here monthly in my blog, with a little more room for explanations and photos.
Your Experience Level and Guarding Against Task-Loading
Before we "dive" in, lets do a quick review of dive skills and experience necessary for your safety and the protection of the natural environment that you want to photograph. You need to have excellent buoyancy skills with intuitive, well-practiced, abilities as a diver to get into dive photography. I feel that it takes most new divers between 50-100 cold-water dives, because you will be adding a lot of task-loading and additional skills.
Not having this experience can result in damaging a reef, or more dangerously, an unsafe situation for you. You should feel that diving is intuitive to you and not have to think about it too much.
That doesn't mean that you can't buy your camera and become just as intuitive with your camera skills while you gain diving experience. It's a little tough to read a manual when you're 60 feet under water, so knowing your camera well really helps.
A hidden danger to a dive photographer, particularly in cold-water, is task loading beyond your experience level, or what the diving conditions can dictate. If in doubt, leave the camera topside, explore and shoot another time. Dive safety and protection of the underwater environment must come first!
Getting Started
Diver-photographers are faced with a bewildering assortment of cameras and options when it comes to buying a camera. Digital camera technology seems to change every day. Rather than just buying something that looks cool, or that a salesman recommends, I’d suggest a more methodical approach.
My Recommendations
I generally recommend a camera and housing as opposed to an amphibious camera, or dedicated camera/housing solution. Canon, Olympus, Fuji and Nikon build an amazing amount of cameras and many can be used very successfully underwater in a housing. The competition between these companies means that their feature-sets and technical advances are changing much faster than dedicated underwater cameras. Plus, there are more housings, external equipment and third-party solutions available, that can be moved to an upgraded system later. Simply put, they are a better value and can be used well above water too.
There are some very good, dedicated amphibious cameras; some have good controls and a sharp lens. They are smaller to carry and simpler to use, but you'll be at the higher price range to get the control and quality you want. I think housed systems offer more quality for less money.
My company Optical Ocean Sales.com, is an authorized dealer for Fantasea Line underwater photography products, which makes housings for Nikon CoolPix digicams and DSLR housings for Nikon, Canon and Olympus. I really like the CoolPix P3 and the Nikon D80 or Canon xTi 400 for underwater use.
Make sure whatever camera you buy, that you have as much manual control as possible. Why? Because most automatic camera features are not designed for the low light conditions you find underwater. Also with an external strobe, you’ll need to use manual or aperture/shutter priority modes to adjust your strobe exposure.
Whatever camera you have, my best advice is to get out there and shoot! Practice does make perfect!
Next Column: 5 Tips for Better UW photos
I’ll re-print them here monthly in my blog, with a little more room for explanations and photos.
Your Experience Level and Guarding Against Task-Loading
Before we "dive" in, lets do a quick review of dive skills and experience necessary for your safety and the protection of the natural environment that you want to photograph. You need to have excellent buoyancy skills with intuitive, well-practiced, abilities as a diver to get into dive photography. I feel that it takes most new divers between 50-100 cold-water dives, because you will be adding a lot of task-loading and additional skills.
Not having this experience can result in damaging a reef, or more dangerously, an unsafe situation for you. You should feel that diving is intuitive to you and not have to think about it too much.
That doesn't mean that you can't buy your camera and become just as intuitive with your camera skills while you gain diving experience. It's a little tough to read a manual when you're 60 feet under water, so knowing your camera well really helps.
A hidden danger to a dive photographer, particularly in cold-water, is task loading beyond your experience level, or what the diving conditions can dictate. If in doubt, leave the camera topside, explore and shoot another time. Dive safety and protection of the underwater environment must come first!
Getting Started
Diver-photographers are faced with a bewildering assortment of cameras and options when it comes to buying a camera. Digital camera technology seems to change every day. Rather than just buying something that looks cool, or that a salesman recommends, I’d suggest a more methodical approach.
- What do you want to do with your photos?
Use them on a website or in emails? Print snapshots, or large wall-prints? Maybe see your work published? - How much do you want to grow your system? Are you starting out with a digicam and thinking about growing into a DSLR system later, or is your use more casual, capturing a few shots from a dive trip for fun?
- Where are you going to be shooting? Tropical or cold water? Working controls with gloves on, strong strobes and having durable equipment is important here in the Pacific Northwest. In tropical waters a lighter, smaller system may work fine for you and be easier to pack and carry.
- What do you like to shoot?Macro? Fish-portraits, maybe a close up of your buddy? Or do you want to “shoot up the reef” and do wide-angle shots?
- Do you want a camera for above-water, as well as underwater, use? How well supported is it, can it take good top-side photos as well?
- How much are you planning on upgrading in the near future?What strobes will it connect to? External lenses and other add-ons? Can they be used with other cameras and systems?
And, oh yeah, how much are you able to spend? This is not a cheap hobby, and you pretty much get what you pay for.
My Recommendations
I generally recommend a camera and housing as opposed to an amphibious camera, or dedicated camera/housing solution. Canon, Olympus, Fuji and Nikon build an amazing amount of cameras and many can be used very successfully underwater in a housing. The competition between these companies means that their feature-sets and technical advances are changing much faster than dedicated underwater cameras. Plus, there are more housings, external equipment and third-party solutions available, that can be moved to an upgraded system later. Simply put, they are a better value and can be used well above water too.
There are some very good, dedicated amphibious cameras; some have good controls and a sharp lens. They are smaller to carry and simpler to use, but you'll be at the higher price range to get the control and quality you want. I think housed systems offer more quality for less money.
My company Optical Ocean Sales.com, is an authorized dealer for Fantasea Line underwater photography products, which makes housings for Nikon CoolPix digicams and DSLR housings for Nikon, Canon and Olympus. I really like the CoolPix P3 and the Nikon D80 or Canon xTi 400 for underwater use.
Make sure whatever camera you buy, that you have as much manual control as possible. Why? Because most automatic camera features are not designed for the low light conditions you find underwater. Also with an external strobe, you’ll need to use manual or aperture/shutter priority modes to adjust your strobe exposure.
Whatever camera you have, my best advice is to get out there and shoot! Practice does make perfect!
Next Column: 5 Tips for Better UW photos
Seattle Aquarium Expansion Construction

Windows on Washington tank
The impact of the New Currents Campaign will expand the Aquarium by 18,000 square feet to include a fresh new exterior, new Alaskan Way entrance and exhibit hall. At the heart of the expansion will be the Puget Sound Great Hall, a three story, light-filled building with interactive educational kiosks, sea life art and thought-provoking conservation exhibits focused on Puget Sound ’s ecosystems. Visitors will immediately be drawn to the end of Puget Sound Hall by the Window on Washington Waters, a 17-foot by 39-foot, 120,000 gallon showcase exhibit evoking Neah Bay’s rock blades filled with salmon, colorful rockfish, vibrant sea anemones and other marine life swimming amid a kelp-filled sea. New visitor amenities will include a full-service café and gift store, member entrance, additional ticketing stations and second floor viewing platforms for a three-dimensional look into Window on Washington Waters. A separate school group entrance will provide quick access for the increasing number of students and teachers who visit the Aquarium. The transition hall between the Windows on Washington Water exhibit to the tidal waters of the Life on the Edge exhibit will feature an open 40-foot by 8-foot Wave Tank allowing visitors the opportunity to hear the surging waves and observe how marine animals and plants survive in swirling, rough water.Yes, we're going to dive in that tank!
Rusty? Nah, Not Us!
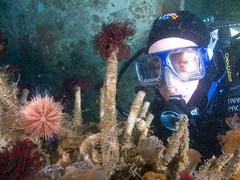
 My Dive buddy Ed "Doc" Kay rounded up the six of us for a boat dive last Saturday to Waterman Wall on the west entrance to Rich Passage, near Port Orchard and Bremerton. We loaded up and got underway at about 10am and made quick time in calming conditions across the sound. The cloud cover came over us, but it was pretty nice overall, considering we'd had snow as late as last Monday. Definately "wait-a-minute" northwest weather.
Waterman Wall a very nice dive, but has some strong currents and can have a downdraft on the ebb, so it's an advanced+ dive. One story goes that a guy was lost there and the only thing they found was an empty "spare air" on one of the rocky shelves. Normally I've dove it from the east side on the end of the flood, this time we were diving on the end ebb, so we anchored on the west side of the light.
We got suited up "and waited just a bit for the tide to turn. I gave a quick brief, I knew the wall extended to the light from the east, but wasn't sure how far past it west it extends - turns out it keeps going for a while. We probably could of gotten in a little earlier, but "DiveAlert" Dave got in with his rebreather and scooter first, followed by another team of Kevin and Delores. I was being a good guide to the site and had helped Delores not to forget her drysuit inflator hose connection.
But Paul, Ed and I were just a bit rusty getting into our gear, not having really dove in a couple of months. The best was Paul; he jumped in without his fins on, then after getting them on we turned around to find him trying to hand up his tank, as the BC dump hose had gotten cross-threaded and wouldn't hold air. That was corrected and he was finally ready for his second attempt to dive. Ed fussed around for quite a while with crossed hoses and lights, while I found that my canister light had been left at home. Luckily Ed had a good spare on board.
Now it was my turn to jump off, everything seemed fine, but as I descended I kept punching my chest inflator to find that I had left my inflator hose disconnected. I put it on after a good squeeze at 35' with Paul's help. Gees, the 3 Stooges Go Diving...
Our team shared a scooter and I easily pulled the 3 of us out to the wall making up for some lost time. It was completely slack. Paul peeled off and Doc and I continued our dive, enjoying the craggy wall. Vis, while pretty good up shallower, was very poor at 70' on down, probably because of the big mornign tide exchange. We hit 98 feet for a few minutes and made our way back up to 70-80' for most of the rest of the dive.There were lots of huge male Lingcod on eggs, some easily in the 5' range. We saw one bright vermilion one in a hole. Lot of rockfish and invertebrates. The other teams found the one resident old wolf eel at 85', but we missed him.
The tide had turned and I again pulled us up-current for a while with the scooter, then we drifted back. Ed and I shared the scooter and he found out the hard way that it's easy to get task loaded with the bulky device, as he floated away from me and didn't stop his ascent until 20'.
I continued solo back up to the east bay where we had anchored and spotted a very nice Bay Pipefish and a few nudibranchs in the shallows.
Back on board we found that while we had dove the sun broke out and we sat on the boat enjoying a few beers with our lunch while a pair of eagles stood guard. What a treat, after the awful winter we've had!
Photos at: Wall Surface Shots
New Flickr Group: Cold Water Diving
I've started a Flickr group to discuss and post photos taken in temperate to cold water conditions. Dealing with a dry suit and shooting photos can be tricky. What are your tips and tricks? Post your best shots!
It is public, but you have to be a Flickr member to join.
Flickr: Cold Water Diving Group
Jack
It is public, but you have to be a Flickr member to join.
Flickr: Cold Water Diving Group
Jack
Wednesday, December 27, 2006
Now For Something Completely Different
Decided to take a break from Seattle drizzle and cold and go to the desert for the holidays to see some friends. Took along my new Nikon D80 system and have been having fun shooting some scenery.
We went up to Sedona for Christmas and was able to go out to shoot some of the beautiful red rock formations for which the area is famous.

I've been shooting with my new lenses; Sigma 17-70mm f/3.5 Macro, 70-300 f4.5 APO Macro and Nikon 50mm f/1.8. I bought a polarizing filter for the 17-70 and was quite pleased with the dramatic skies and color. The only bummer was when i somehow got a watterspot onthe filter and didn't see it on the last day's shooting. I'm hoping I can fix the spot in Photoshop.
posted by Onix at
5:59 AM
![]()

0 Comments:
Post a Comment
Subscribe to Post Comments [Atom]
<< Home